
From a typed list of dishes to a printed menu card
The help block above gives you the three steps. This guide goes deeper. It takes the dish line apart slot by slot, explains what every control in the form changes on the sheet, lists the four ways to get the finished card off the screen, and walks through a full example for a small bakery. A fault list at the end covers the moments when the preview does not look the way you expected.
Who ends up needing one of these
Food changes faster than design files do. A lunch room swaps its soup every week. A supper club runs one night and never repeats the list. A stall at a market prints a fresh card when the fish comes in. In all of those cases the slow part is never the cooking. It is finding whoever made the last menu and opening a file only their software can read.
Typing the dishes as plain text removes that problem. The list lives in a box you can edit on any machine, and the layout is rebuilt as you press each key. A price can change at four in the afternoon and a new card can be on the tables before service.
One dish per line, split by upright bars
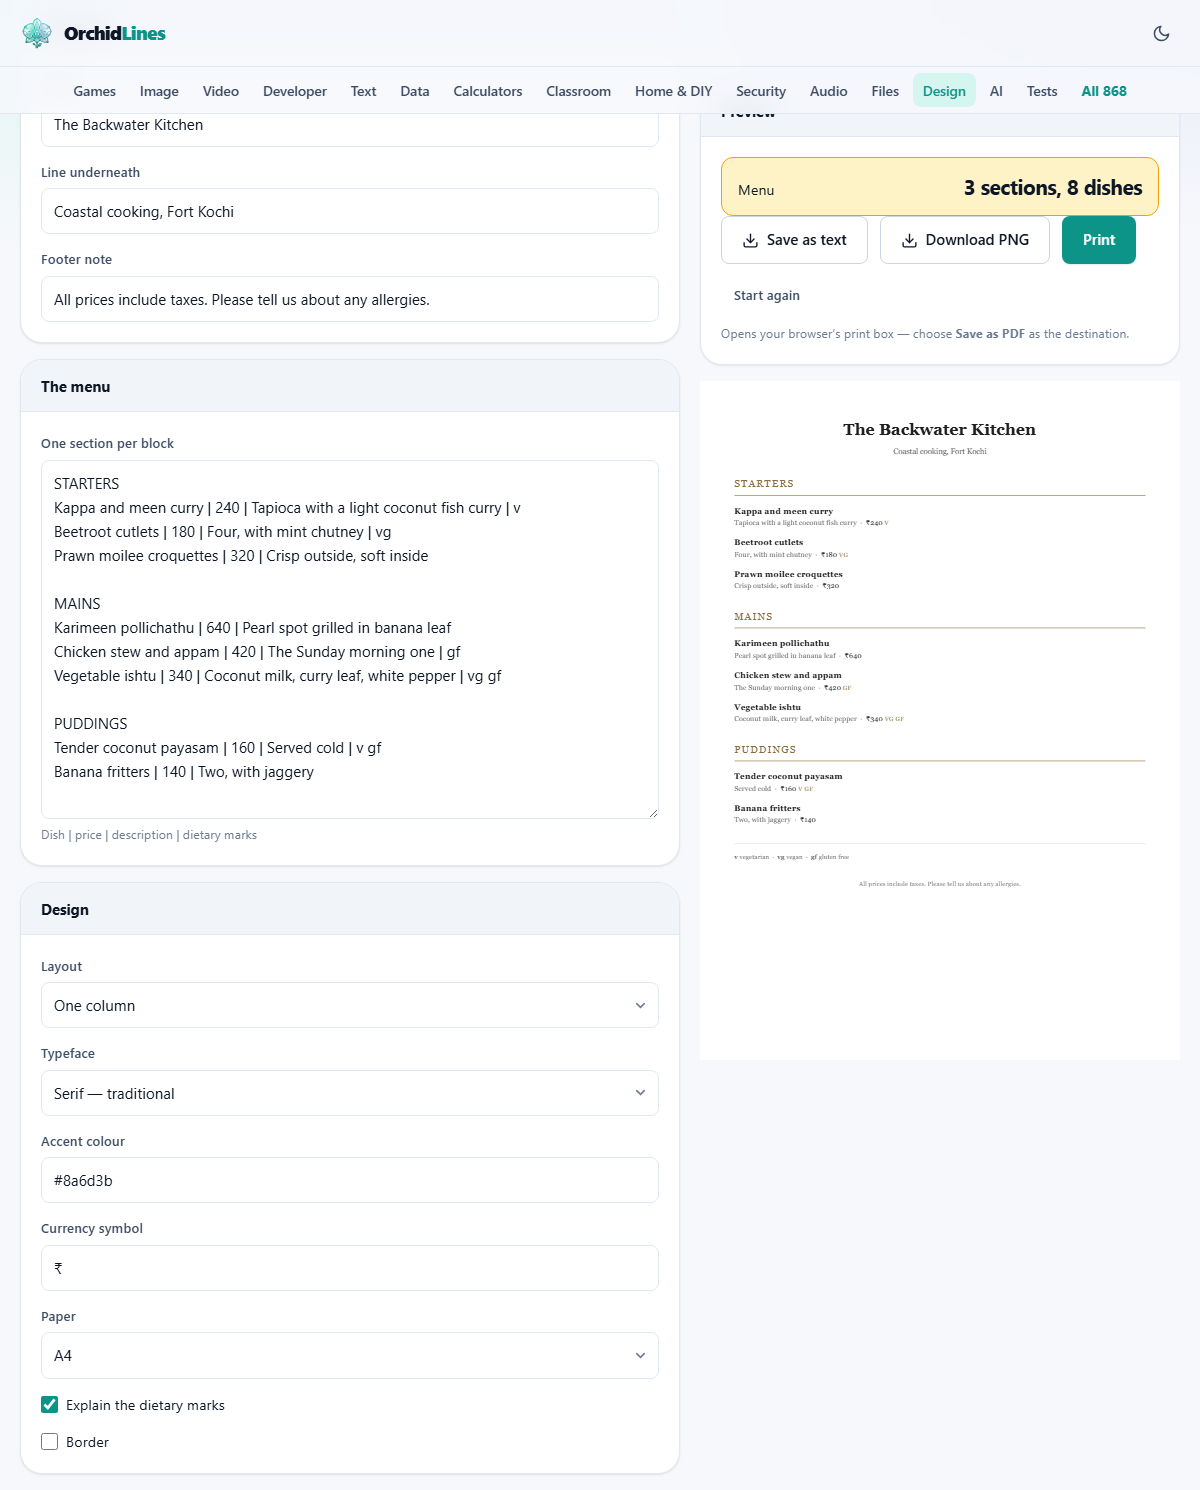
The big box in the middle of the form is where the menu is written. Each dish gets a single line. Inside that line you separate up to four pieces of information with the vertical bar, the tall upright character that usually shares a key with the backslash. The order of the slots is fixed, and you can stop as soon as you have said enough. A dish name on its own is a valid line.
- Slot one is the name. It is the only slot that must have something in it. A line with no name is thrown away, so a stray bar on an empty line does no damage.
- Slot two is the price. Type the digits alone. The symbol in front comes from a separate box, so you never key it in twice.
- Slot three is the description. One short line that says something true about the dish.
- Slot four is the dietary codes. Type them as short words with a space between each one.
Blank lines are what build the sections
There is no button for adding a section. A blank line does it. Any run of lines with an empty line above and below becomes one block, and the first line of that block is the heading. Everything after it becomes a dish under that heading.
Headings are drawn in capitals with wide letter spacing, in your accent colour, with a thin rule underneath. You can type them in lower case; the sheet puts them into capitals for you. Each block is also told to hold together, so a heading and its dishes are not split by a column break or a page break.
The three fields at the top of the form
Above the menu box sits a small panel called The place, holding the parts that are not dishes. Name prints large and centred at the top of the card. Line underneath prints below it in small grey type, which suits a location, a date, or a note such as kitchen open until nine. Footer note prints at the very bottom in smaller grey type, which is where an allergy notice, a service charge or opening hours belong. Clear any of the three and that part of the card is simply not drawn.
Every control in the Design panel
The third panel decides how the same words are set. Change any of it and the sheet on the right redraws at once.
- Layout. One column sets the price quietly after the description, with a small dot between them. Two columns pours the same content down two narrow columns with a 10 mm gap. Dotted leaders to the price puts the name on the left, dots across the gap, and the price on the right in bold.
- Typeface. Serif is the traditional look with small strokes on the letters. Sans is the plainer modern look. The third choice mixes them: serif headings, sans for everything else.
- Accent colour. Type a hex code such as 5b6e4f with a hash in front. It colours the section headings, the rule under each one, the dietary codes beside each dish, and the border.
- Currency symbol. Whatever you type here is stuck onto the front of every price. Empty the box and the prices print as bare numbers.
- Paper. A4 is 210 by 297 mm. A5, the table menu size, is 148 by 210 mm. Long and narrow is 105 by 297 mm, a tall slim card for a table or a bar.
- Explain the dietary marks. Adds a small key above the footer. It lists only the codes you actually used, so a menu with no vegan dishes never explains vegan.
- Border. Draws a line right around the card in the accent colour, with a margin of white inside it.
The six codes the key knows
The last slot on a dish line accepts any short word, but only six of them can be explained in the key. They are v for vegetarian, vg for vegan, gf for gluten free, n for contains nuts, s for contains shellfish, and sp for spicy. Type them in lower case with a space between them, so a dish that is both vegan and gluten free ends with vg gf.
Invent a code of your own and it still prints beside the dish, but the key has nothing to say about it. If you need to flag something the six do not cover, say it in the description. On the card the codes appear in tiny capitals in the accent colour, out of the way of the reading.
Four ways to get the card off the screen
Above the preview there is a line that counts your sections and your dishes. It is a quick check before you commit anything to paper. Below it sits the button row.
Print opens your browser's own print box. On most machines that box also offers a Save as PDF destination, which is how you send a menu to a print shop. Save as text writes a plain menu.txt file holding the words in the order they were laid out, which is what a website or a delivery listing wants. Download PNG saves a picture of the card at twice screen size. Start again wipes the saved copy and reloads with the sample menu back in place.
Worked example: a bakery lunch card
Say a bakery called Flour and Salt wants an A5 card for its eight tables. Put Flour and Salt in Name and Bakery and lunch room in Line underneath. In Footer note write: please tell us about any allergies before you order.
Now clear the menu box and type three blocks, each separated by one blank line. The first is headed SANDWICHES, with lines such as Ham and mustard | 6.50 | Thick cut ham, our own mustard butter, then Cheddar and pickle | 5.80 | Farmhouse cheddar, sharp onion pickle | v. The second block is headed SOUP AND SALAD, and one of its two lines reads Winter slaw | 4.50 | Red cabbage, apple, toasted seeds | vg gf. The third is headed CAKES, and one of its three lines reads Almond and pear | 3.60 | Baked with whole almonds | v n.
In the Design panel choose One column, pick the mixed typeface, set the accent to a muted green, put a pound sign in the Currency symbol box, and switch Paper to A5. Leave the key ticked and Border off. The counter above the preview now reads three sections and seven dishes. At the foot of the card a key appears explaining v, vg, gf and n, because those are the four codes the card used. Press Print, choose A5 in the print box, and it is done.
When the preview does not match what you meant
Almost every surprise comes from the shape of the text rather than from a setting.
- Everything landed under one heading. A blank line between two blocks is missing, so the lot counted as one section.
- A dish turned into a heading. There is a blank line directly under a heading, which ended that block early.
- The price shows two symbols. You typed the symbol into the price slot as well. Delete it from the dish line.
- A description sits where the price should be. The line has only two slots, so the second was read as the price. Type two bars with nothing between them to leave the price empty.
- Codes print but nothing explains them. Either the key is switched off, or the code is not one of the six.
- Two columns look cramped and words break oddly. Long dish names need room. Go back to one column, or move up from A5 to A4.
- A whole section slipped to the next page. That is the block staying together on purpose. Shorten it, or accept the break.
When a different tool suits the job better
This maker sets type on a clean sheet. It does not place photographs, drop in a logo, or paint a background image. If the menu you have in mind is really a poster with a picture of the dish on it, use the Design Editor on this site instead.
A single dish written out with ingredients and a method is not a menu at all, and the Recipe Card Maker is shaped for that. Jar labels and shelf tickets belong on the Label Sheet Maker, which arranges many small pieces across one sheet.
Where your menu is kept
Every part of this runs inside the page on your own computer or phone. The dish list is read there, the sheet is drawn there, and the print box is your browser's, not ours. Nothing you type is sent anywhere, so there is no account to make and nothing to delete later.
Your work is remembered in the browser's own storage, so the card is still there tomorrow. That storage belongs to one browser on one device. A menu typed on the shop laptop will not appear on your phone, and clearing your browsing data takes it with it. If a card matters, press Save as text and keep the file. Start again exists for the opposite case, when you want the page clean for a different menu.