
Making a sheet of stickers land where the glue is
Label paper is unforgiving. The sticky rectangles are already cut, and your text either sits inside them or straddles the gaps. This guide explains what each control on the page changes, how the six ready-made sheet sizes are built, when to switch to your own measurements, and the test that stops you ruining a packet. A full run of forty-seven addresses is worked through at the end.
Why sticker sheets punish guesswork
An ordinary document flows. Type more and it pushes the rest down the page, and nobody minds. Label paper does not work like that. Each rectangle has been die-cut in the factory at a fixed spot, and your printer has to hit it.
So this page throws away the usual idea of a document. It places every label at an exact position measured in millimetres from the corner of an A4 sheet.
That is why the settings deserve two minutes. Get them right once for the sheets you buy and the printer you own, and every future run drops straight onto the glue.
Two ways to fill a sheet
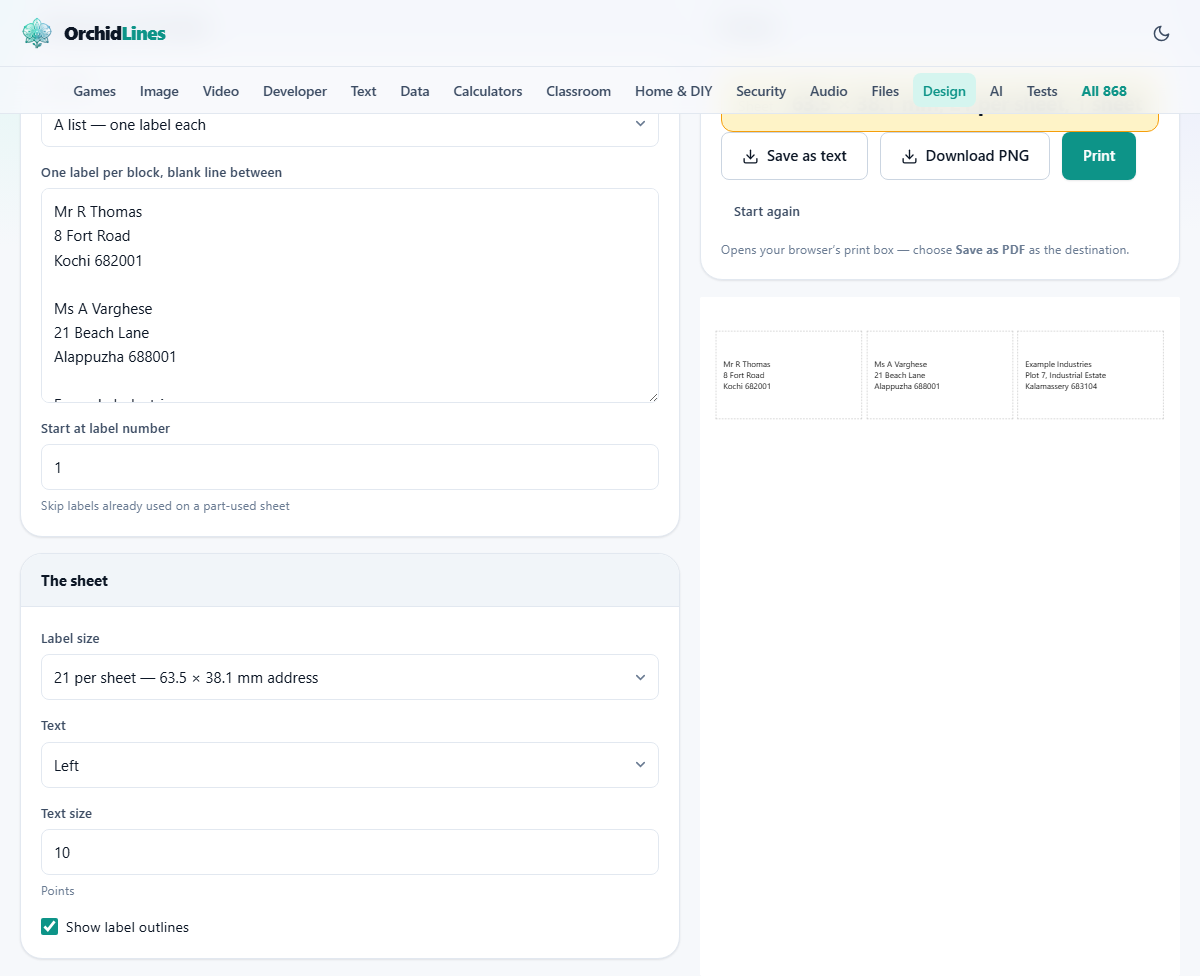
The Content menu at the top decides the whole job. A list, one label each takes a batch of different addresses and works through them. The same label repeated fills every position on the sheet with identical text, which is what you want for return addresses, jam jars or a box of school pencils.
The page shows only the box that matches your choice. In list mode you get the large text area labelled one label per block, blank line between. Type or paste as many blocks as you like, separated by an empty line. Line breaks inside a block are kept exactly, so a four-line address stays four lines.
In repeated mode that box disappears and a smaller one takes its place for the single label. The starting position box hides too, since every rectangle is being used.
Picking the sheet you actually bought
Label size is the menu that matters most. It lists six standard sheets by the number of labels on them, along with the size of each label in millimetres. The count is printed on the packet, usually on the front, and it is the quickest way to identify what is in your hand.
Twenty-one to a sheet is the classic address label, three across and seven down. Fourteen gives wider labels in two columns. Twenty-four is slightly shorter and packs eight rows in. Forty is a small label four across and ten down, good for jars and cables. Sixty-five is the tiny one, five across and thirteen down, used for keys and file spines. Eight to a sheet gives large parcel labels.
Each preset carries its own margins and spacing, taken from the standard measurements those sheets are made to. Choose one and the page positions everything for you. The last entry, my own measurements, is for anything that is not on the list.
When you need your own measurements
Choose my own measurements and four boxes appear that were hidden before: Columns, Rows, Top margin and Side margin. They stay hidden with a preset selected, because a preset already knows those numbers.
Columns accepts one to ten, Rows one to twenty. The two margin boxes are in millimetres and accept up to forty. From those four figures the page works out how big each label must be to fill the space between your margins, and then places the labels directly against each other with nothing between them.
Measure a blank sheet with a ruler before typing. The top margin is the distance from the top edge of the paper to the top of the first label, and the side margin is the distance from the left edge to the start of the first column. Those two numbers plus the grid describe most sheets well enough to print on.
How the words sit inside each label
Three controls shape the text itself. Text switches between left and centred. Left suits postal addresses, which are read line by line. Centred suits a name, a price or a single word on a jar.
Text size is in points and runs from six to twenty. Ten is comfortable for an address on a standard label. Drop to eight or nine if you have a fifth line, or if a long road name is wrapping awkwardly. On the tiny sheets you will be down near seven.
Show label outlines draws a faint dashed rectangle around each position. It is there so you can see the grid on screen while you work. Those dashes are not sent to the printer, so you can leave the box ticked and the sticker still comes out clean.
Part-used sheets and long runs
Half-used label sheets pile up in every drawer. Start at label number is how you use them up. Count along the rows from the top left, as if reading a page, and enter the number of the first empty position. The page leaves the used ones blank and begins there.
If your list is longer than one sheet, the extra labels flow onto more sheets automatically, each starting on a fresh page. The readout above the buttons tells you where you stand: it gives the label size, how many fit on a sheet, and how many sheets your list has turned into.
Feed a part-used sheet carefully. Peeled areas can catch inside a printer, and a sheet that has been through the rollers once is often curled.
Worked example: forty-seven wedding invitations
The list is forty-seven guest addresses, and the drawer contains one part-used pack of twenty-one-per-sheet labels with the first four peeled off.
Leave Content on the list option. Paste the addresses into the big box with one blank line between each guest. Set Label size to twenty-one per sheet. Set Start at label number to five. Leave Text on left and Text size on ten, since none of these addresses runs past four lines.
The readout now reports twenty-one per sheet across three sheets. Scroll the preview and you can see the first four positions on the top sheet sitting empty, exactly matching the gaps in the pack.
Print the first page onto plain paper and hold it against a real label sheet at a window. The text blocks should sit inside the rectangles with room to spare. If they do, put the part-used sheet in the tray the same way round and print for real.
The test print, and what to change if it is off
Never send a first attempt to real labels. A plain paper test costs one sheet and saves a packet.
If the whole grid is shrunk towards the middle of the page, the print box scaled it. Find the scale setting and set it to one hundred per cent, and set the margins to none or the smallest option offered. The sheet already positions itself from the true corner of the paper, so any margin the print box adds pushes everything out of place.
If the scale is right and the grid is still a millimetre or two out in one direction, that is your printer feeding slightly off. Switch to my own measurements and type the grid and the margins you need, nudging the top or side figure until a test lines up. Write those two numbers on the packet. They will be right for every future run on that printer.
What you get out of it
Print opens your browser's own print box and sends the sheet only, without the controls or anything else on screen. A short reminder appears first suggesting the plain paper test, which is worth taking seriously.
Download PNG, next to it, saves a picture of the laid-out sheet into your downloads with no dialogue at all. It is handy for checking a layout on a phone or handing the design to somebody else. It is not the way to get sharp text onto sticky paper, though. For the real run, print.
Save as text gives you the label wording as a plain text file, which is a quick way to keep the list you just typed.
Faults and their causes
- Text drifts further off as it goes down the page: page scaling is on. Nothing else produces a growing error.
- The first label is fine but later ones creep sideways: the column count does not match the sheet. Recount the rectangles across the top.
- Addresses spill over the bottom edge of each label: too many lines for the size, or the point size is too big. Trim a line or drop two points.
- Only some addresses appear: blocks were separated by a single line break instead of a blank line, so several ran together as one label.
- The dashed boxes are missing from the print: they are meant to be. They exist only to help you on screen.
- The sheet jams: a part-used sheet with lifted edges. Smooth them down or start a fresh sheet.
Other pages for neighbouring jobs
This one lays out text on a grid. If your labels are pictures rather than words, the Sticker Sheet Maker packs images onto a sheet and produces a matching cut file for a craft cutting machine.
If you are addressing envelopes rather than sticking labels on them, the Envelope Address Printer positions text for the common envelope sizes and prints straight onto them. And for name badges with a photograph, or contact cards at bank card size, the ID Card Maker and the Business Card Maker are the right places.
Your address list stays on your machine
A list of names and home addresses is exactly the sort of thing that should not be handed to a website. It is not handed to this one. The layout is worked out by the page itself, inside your browser, and nothing you paste is transmitted.
Your settings and your text are remembered in this browser so the next run starts where you left off. That copy sits on this computer only. Start again wipes it and restores the defaults.