
Plan a wall of frames, then mark every nail in the right spot
This page lets you arrange picture frames on a wall to scale, then gives you the exact spot for each nail: how high off the floor and how far along from the edge. It also prints full-size paper shapes to tape up first. Below is what every setting does, a worked example with real numbers, and the mistakes to dodge.
What the gallery wall planner does
Hanging a group of pictures by eye is how you end up with a wall of holes you did not mean to make. The planner takes the guesswork out. You draw the wall and the frames on screen, shuffle them until the layout looks right, and it works out the two numbers you actually need up a ladder for each frame: how far up, and how far across, to put the nail.
It suits a first gallery wall in a hallway, a run of prints over a sofa, a set of certificates in an office, or a child's drawings on a landing. Anyone with a few frames and a bare wall can plan the whole thing sitting down, then hang it once, in the right place, with no trial holes.
Describing the wall and the frames
Start with the wall. Wall width and Wall height are two number boxes, both in millimetres, starting at 3000 wide and 2400 tall. Type the real size of the wall you are hanging on so the drawing matches your room.
Then list the frames in the Your frames box, one size per line. Write the width, an x, then the height, such as 400 x 500. To repeat a size, add another x and a count, so 400 x 500 x 2 means two frames of that size. Measure the frame itself, the outside of it, not the picture inside. You can also add a comma and a number at the end of a line to give that size its own hanger drop. A line that begins with a hash mark is treated as a note and skipped, which is handy for labelling groups of frames.
The hanger drop, the number people forget
The hanger drop is the distance from the top edge of the frame down to the hook, measured with the wire pulled up taut as if it were already on the nail. It is set with the Hanger drop box, in millimetres, starting at 40. This one number is the whole secret of hanging pictures, and the mistake nearly everyone makes once.
Here is why it matters. You decide where the frame should sit, measure to its top edge, and knock the nail in there. But the wire droops below the top edge before it reaches the hook, so the picture ends up hanging a hand's width too low. The nail belongs at the top of the frame minus the drop. Every number in the table has that subtraction already done, which is why the heights look lower than you might expect. Measure the wire pulled hard, because that is the shape it takes on the hook.
Choosing an arrangement
The Arrangement menu offers three starting layouts. Salon fills balanced rows and centres the block, which suits a mix of sizes. Grid lines everything up in even columns and rows, and shows a Columns in the grid box so you can set how many go across. A single row on the centre line puts every frame in one straight line.
Two more settings adjust the spacing. Gap between frames, in millimetres, sets how much air sits around each one; between 50 and 80 tends to read as a single group. Centre the group at lets you type how far from the left edge the middle of the arrangement should fall, in millimetres, and leaving it blank centres the block on the wall.
Moving frames by hand
The starting layout is only a starting point. Grab any frame in the drawing with the mouse and drag it where you like. As you move it near another frame, it snaps to line up with that neighbour's edge or middle, so getting things level does not depend on a steady hand. You only need to get close, within about a centimetre, and it clicks into line.
Once you drag anything, the tool remembers your hand-placed positions, and the nail numbers update to match. If you make a mess of it, the Tidy it up again button throws away your moves and rebuilds the neat layout from your settings. It is a safe undo for the whole wall.
Heights and units
Centre line above the floor sets the height, in millimetres, that the middle of the arrangement lines up on. It starts at 1450, the height galleries hang to, which is about eye level for a standing adult. Drop it towards 1400 for a room where people are usually seated, such as above a dining table.
Show the answers in switches the table and drawing between millimetres, centimetres and inches. This only changes how the answers are shown to you. Everything you type in, the wall, the frames and the gaps, is always read as millimetres, so the tool never mixes two units up and quietly produces nonsense.
Furniture and template paper
Show furniture below draws a piece of furniture at the bottom of the wall, so you can judge the gap above it. Ticking it reveals Furniture width and Furniture height boxes. A picture over a sofa wants 150 to 250 millimetres between the top of the sofa and the bottom of the frame, and seeing the block drawn in makes that easy to get right.
Template paper chooses the page size for the printed shapes: A4, A3 or Letter. A frame bigger than one page is split across several sheets that overlap, so you tape them together into the full outline. Each shape carries a cross where the nail goes and a label with the frame's size and its nail position.
What comes out
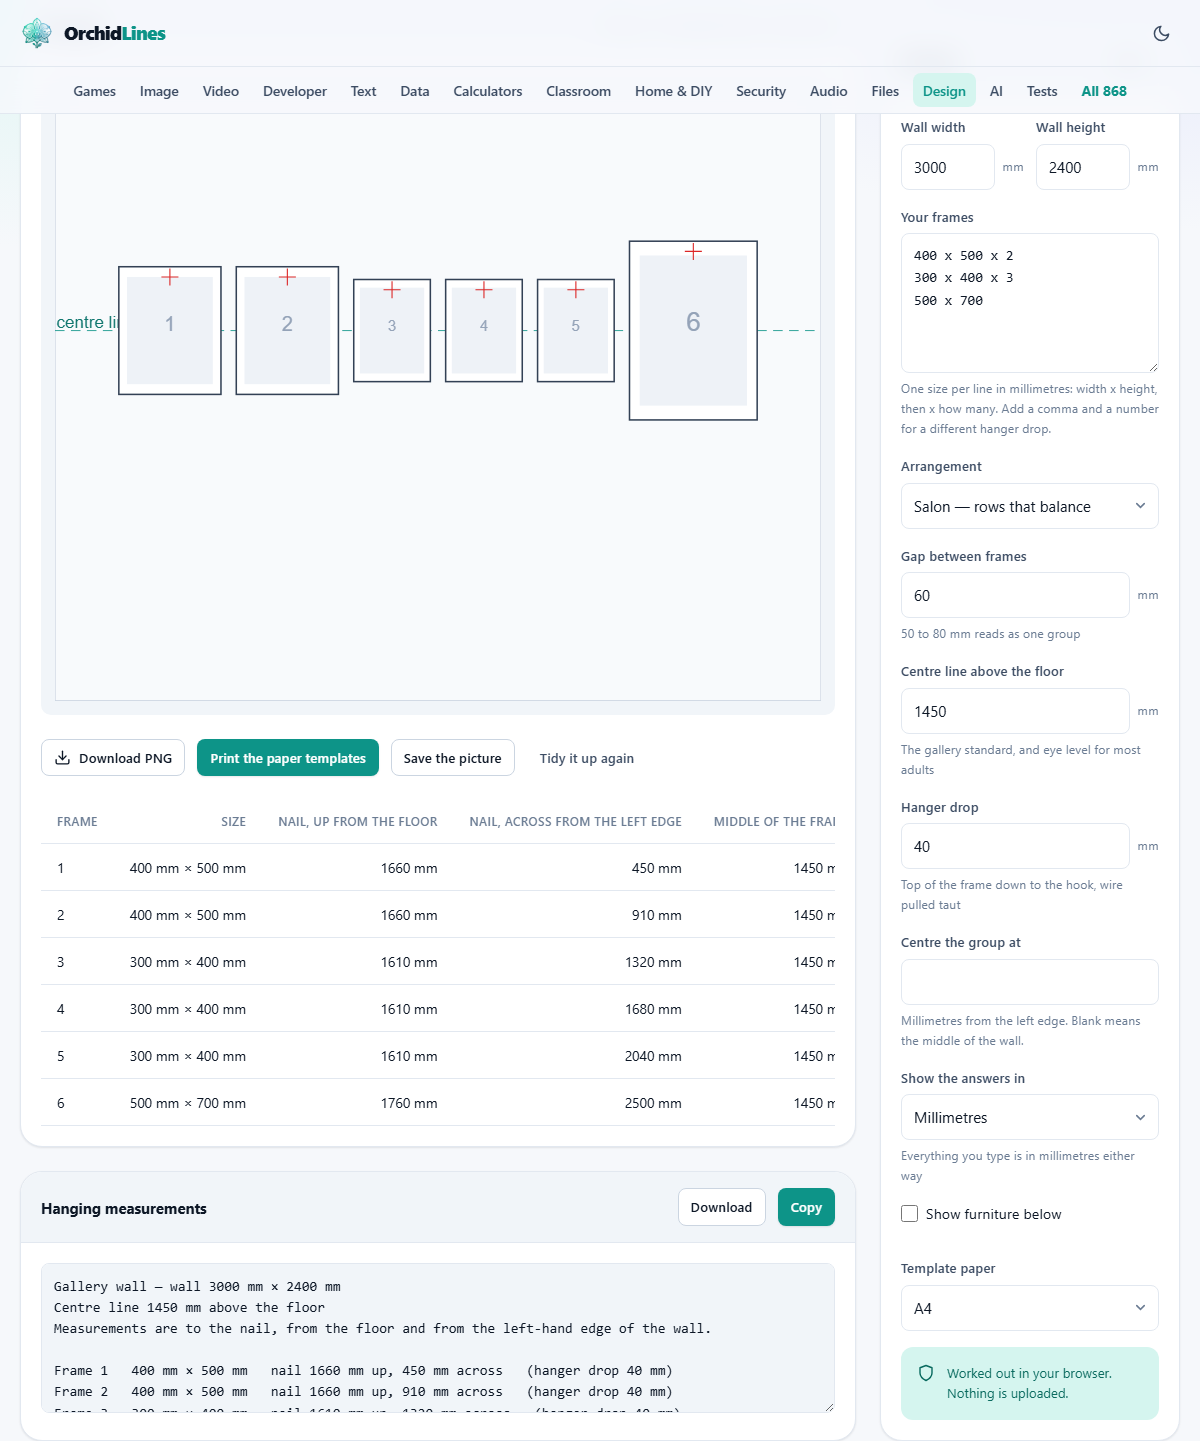
You get three kinds of output. On screen, the drawing shows the wall, a dashed centre line, each frame numbered, and a small red cross marking every nail. Below it, a table lists for each frame its size, the nail height up from the floor, the nail position across from the left edge, the middle of the frame, and the hanger drop used. If a frame ends up past the wall's edge, a short warning appears under the table and tells you what to change.
The buttons turn that into things you can take away. Print the paper templates opens your browser's print box so you can print the full-size shapes at 100 percent; from that box you may also save them as a PDF to print later. Save the picture downloads the wall drawing as an image file. In the measurements panel, Download saves the nail list as a text file, and Copy places it on your clipboard for a note or a message.
A worked example
Leave the wall at 3000 by 2400 millimetres. In the frames box type 400 x 500 x 3 for three matching frames. Set the Arrangement to a single row on the centre line, the Gap between frames to 60, the Centre line to 1450, and the Hanger drop to 40. Leave Centre the group at blank so the row sits in the middle of the wall.
The three frames line up across the centre. The middle frame's row in the table reads: size 400 by 500, nail 1660 millimetres up from the floor, and 1500 across, which is dead centre of the wall. The 1660 comes from the centre line at 1450, plus half the 500 frame height, minus the 40 drop. The outer two frames share the same 1660 height, at 1040 and 1960 across. Switch the units to inches and the same nail reads about 65 inches up. Now press Print the paper templates, tape the shapes to the wall, and live with them for an evening before you pick up a drill.
Common mistakes and how to fix them
The biggest mistake is measuring the wire while it hangs slack. A loose wire gives a drop that is too small, and every frame then hangs several centimetres low. Always pull the wire up tight, to the shape it will hold on the hook, before you measure the drop.
The second is ignoring the warning that a frame is hanging past the edge of the wall. When that appears, make the wall bigger, shrink the gaps, or use fewer frames until it clears. The third is lining up the tops of mixed frames instead of their middles; a wall only looks deliberate when the middles agree, which is exactly what the centre line does for you.
Worked out on your device
The whole plan is put together on your own computer. The drawing, the nail table and the paper templates are all made inside the page, and nothing about your room, your walls or your pictures is sent anywhere. There is no account and no upload at any step.
Your arrangement, including any frames you have dragged into place, is saved in this browser so you can come back and finish later. That saved layout lives on this one device only. If you plan a wall you will not hang for a while, the text list of measurements is easy to keep as your own record.