
Building an email signature that still looks right when it arrives
The help above explains why email needs old-fashioned HTML and how to paste the result in. This guide goes box by box. It says what each field does, how the parts appear in the finished signature, the two different ways to copy it, and the traps that make an image break for everyone but you. A full example and a privacy note round it off.
A signature that survives the trip
An email signature looks simple, but it is one of the harder things to build well. Email programs are fussy about HTML. Outlook on Windows lays a message out using Word. Gmail strips out any separate block of styling. The modern layout tricks that work on a web page do not work here at all.
So this tool builds the one kind of markup that survives: a table with the styling written straight onto each part. It looks dated under the hood, but it holds together in the programs your readers really use. You fill in a form on the right, and the signature builds itself in the preview beside it.
It is for anyone who sends work email. A new starter setting theirs up on day one. A freelancer who wants to look established. An office trying to make everyone's match.
Filling in your details
The rail on the right is a list of boxes. Fill in the ones you want and leave the rest empty. Anything blank simply does not show, so a short signature is just a matter of filling fewer boxes.
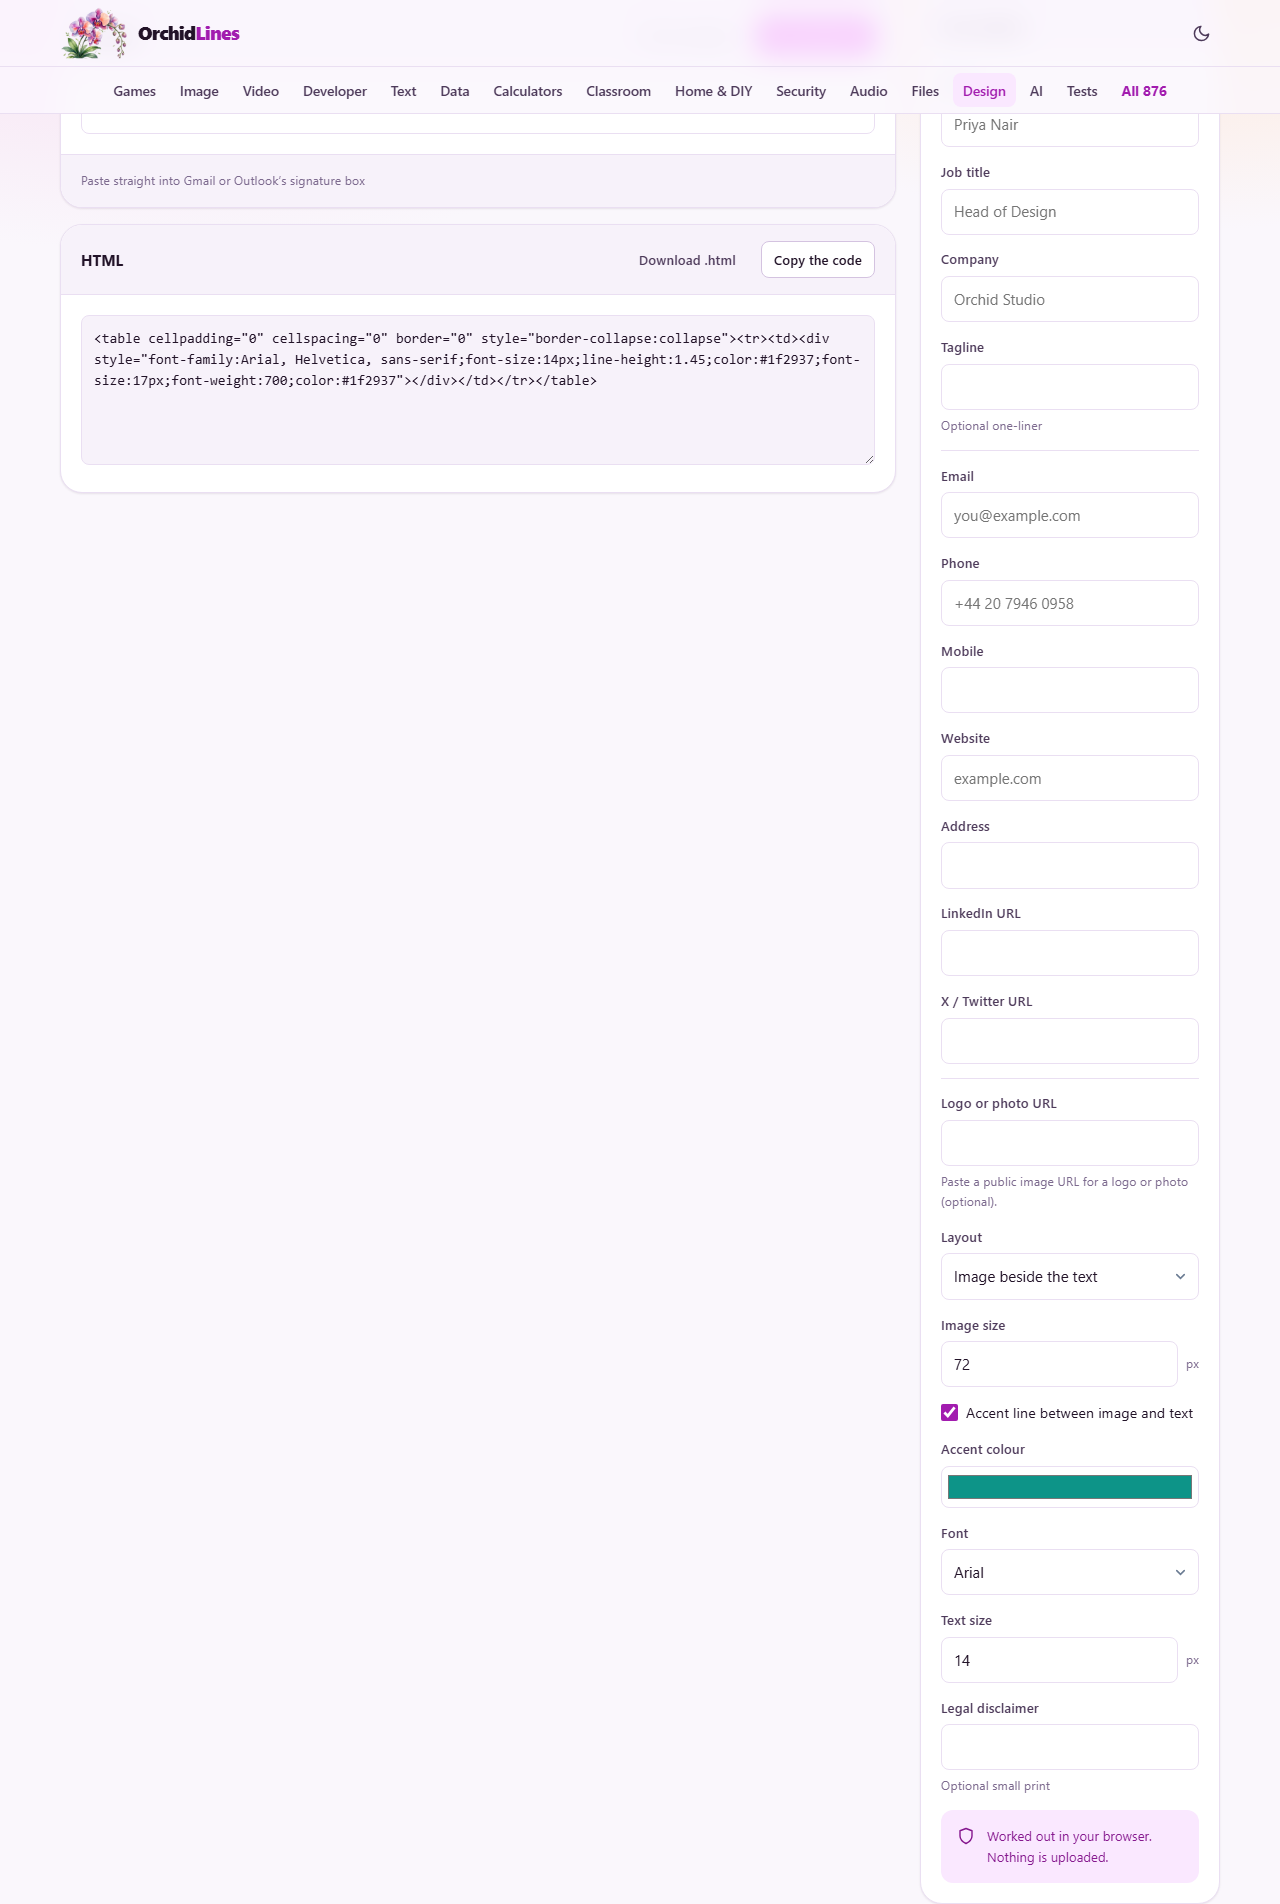
Name sits at the top in bold. Job title and Company appear on the next line, joined by a dot, so 'Head of Design' and 'Orchid Studio' read together as one line. A Tagline, if you add one, goes below in the accent colour as a short line in italics.
Then come the contact boxes: Email, Phone, Mobile, Website and Address. On the finished signature the phone is marked with a small T and the mobile with an M, so a reader can tell the two apart at a glance.
Links that always work
Email and Website turn into links you can click. The website is tidied so it shows without the http part in front of it. Fill in a LinkedIn address or an X profile address and each is added as a short bold word: LinkedIn, or X.
Those social links are text on purpose, not little icons. Icon pictures have to be hosted somewhere, and many email programs hide images until the reader allows them, so an icon often turns into an empty box. A plain word link never does that.
Adding a logo or photo
To include a logo or a headshot, paste its web address into the 'Logo or photo URL' box. It must be a public link that anyone can reach. A file saved on your own computer will show for you and be broken for everyone else, which is the single most common mistake people make with signatures.
The Layout menu decides where the image goes: beside the text, a round version of it beside the text, or above the text. 'Round photo beside the text' is the friendly choice for a headshot. Image size sets how big the picture is in pixels, from 40 up to 180.
'Accent line between image and text' draws a thin coloured line down the gap when the image sits beside the text, which smartens up the join. It is switched on to begin with.
When you pick 'Image above the text', that accent line is not used; the picture simply sits on top with your details beneath it. That stacked layout suits a wide logo better than it suits a square headshot.
Colour, font and size
Accent colour is the single colour used for the links, the tagline, and that dividing line. Pick something close to your brand. It starts on a teal green.
The Font menu is short by design: Arial, Georgia, Verdana, Trebuchet and Courier. These are all typefaces already on nearly every computer. A signature can only use a font the reader already has, because email will not fetch a fancy web font, so anything unusual would just drop back to something plain.
Text size sets the body lettering in pixels, from 10 to 20, starting at 14. The name is drawn a little larger than the body, and the address and the social line a little smaller, so the whole thing keeps its balance as you change the size.
The legal disclaimer
The last box is for a legal disclaimer, the small print some organisations must add about confidentiality. Whatever you type there is drawn in faint grey below a thin line, set apart from your contact details. Leave it blank if you do not need one, and nothing extra appears.
Copying it into your email
There are two copy buttons, and the difference between them matters. 'Copy signature', above the preview, copies the finished, formatted signature. That is the one to use almost always. Paste it straight into the signature box in your email settings and it arrives looking right.
'Copy the code', by the HTML panel, copies the raw markup instead. You only want that if you are pasting into something that expects HTML source. Next to it, 'Download .html' saves the same code as a file called email-signature.html.
In Gmail, the signature box is under Settings, then See all settings, then General. In Outlook it is under Settings, then Mail, then Compose and reply. Paste it in, save, and send yourself a test message.
Seeing it before you send it
The preview is not a rough sketch. It is the exact signature that gets copied, drawn with the same table and inline styling that will land in the email. Every change you make to a box shows up there at once, so you are always looking at the real thing rather than a guess.
Because email programs differ so much, the safest habit is to paste your finished signature into one real message and send it to yourself. Open that test on a phone as well as on a computer, since the same signature can sit a little differently in each.
If your colleagues use a program you do not, it is worth asking one of them to check it too. Catching a problem once, before you save the signature, beats spotting it on every message you send for the next year.
A worked example
Press 'Fill an example' to load a sample for Priya Nair, Head of Design at Orchid Studio, with a phone, a mobile, a website and an address. The preview fills in at once, so you can see the shape of a finished signature.
Now make it yours. Type over the name and the contact boxes. Change the Accent colour to match your brand, and the tagline shifts to that colour with it. Paste your logo's public web address into the logo box, and choose 'Round photo beside the text' for a headshot.
Happy with it, press Copy signature, open your email settings, and paste it into the signature box. Send a test to yourself, then open it on your phone as well as your computer, because the same signature can look a little different in each.
Common mistakes
Most signature trouble comes down to a handful of things. Run through these before you blame the tool.
- The logo shows for you but is broken for others. It points at a file on your computer. Upload it somewhere public and use that web address instead.
- The signature pasted in as a block of code. You used 'Copy the code' by mistake. Use 'Copy signature' for the version that pastes as formatted text.
- Your chosen font did not stick. It was not one on the reader's machine. Pick from the short menu, which lists only safe, common fonts.
- The signature is too long. It gets quoted into every reply and piles up over a thread. Keep it to a few lines by leaving optional boxes blank.
- An image looks fine to you but is hidden for readers. Many programs block images by default, so a mostly text signature is the safer bet.
When another tool fits better
This makes an email signature and nothing more. If you want a printed business card, a card maker is the right tool, because a card for print and a block for email need very different files.
And if you are building a whole marketing email or a newsletter, this is not that either. It produces a small block for the foot of your ordinary messages, not a full page of layout. Keeping those jobs on separate tools is what keeps each one simple.
Your details stay in your browser
Your name, number and address are personal, so it is worth saying plainly: none of it is uploaded. The signature is built inside the page as you type, and the copy and the download both happen on your own machine.
So the form is still filled in next time, your entries are saved in this browser's own storage. That copy sits on this one device. It is only your own contact details, but if you move to another computer you will fill the form in again there.