
Measuring a book cover so it fits the book
The help panel above walks you through the buttons. This guide goes under the hood: where the spine width comes from, what every box in the settings does, what the drawing marks, and how to hand a clean file to a printer. A full worked example with real numbers sits near the end, then the slips that ruin a cover.
The one measurement you cannot nudge
Most of a cover is a matter of taste. You can move the title, swap the photo, or try a new colour, and none of it changes the shape of the file. The spine is different. It is the thickness of the stack of paper inside the book, and that is fixed by two plain facts.
The first is how many pages the book has. The second is how thick one page of that paper is. Multiply them and you have the spine. A page that is roughly a tenth of a millimetre thick, across three hundred pages, gives a spine near seventeen millimetres. Change either number and the whole cover slides, because the front and back sit on each side of that strip.
Who this page is for
Authors publishing their own books are the main users. If you are sending a paperback to a print service, or carrying a file to a local printer, you need the cover as one wide sheet at the true size, with the folds drawn in. A word processor will never lay that out for you.
It suits anyone binding something with a real back edge. A journal, a workbook, a photo book, a report, a thesis for the binder. Wherever there is a spine, the spine has to be measured, and this does the sum and draws the frame so you do not have to.
Telling it about the pages and the paper
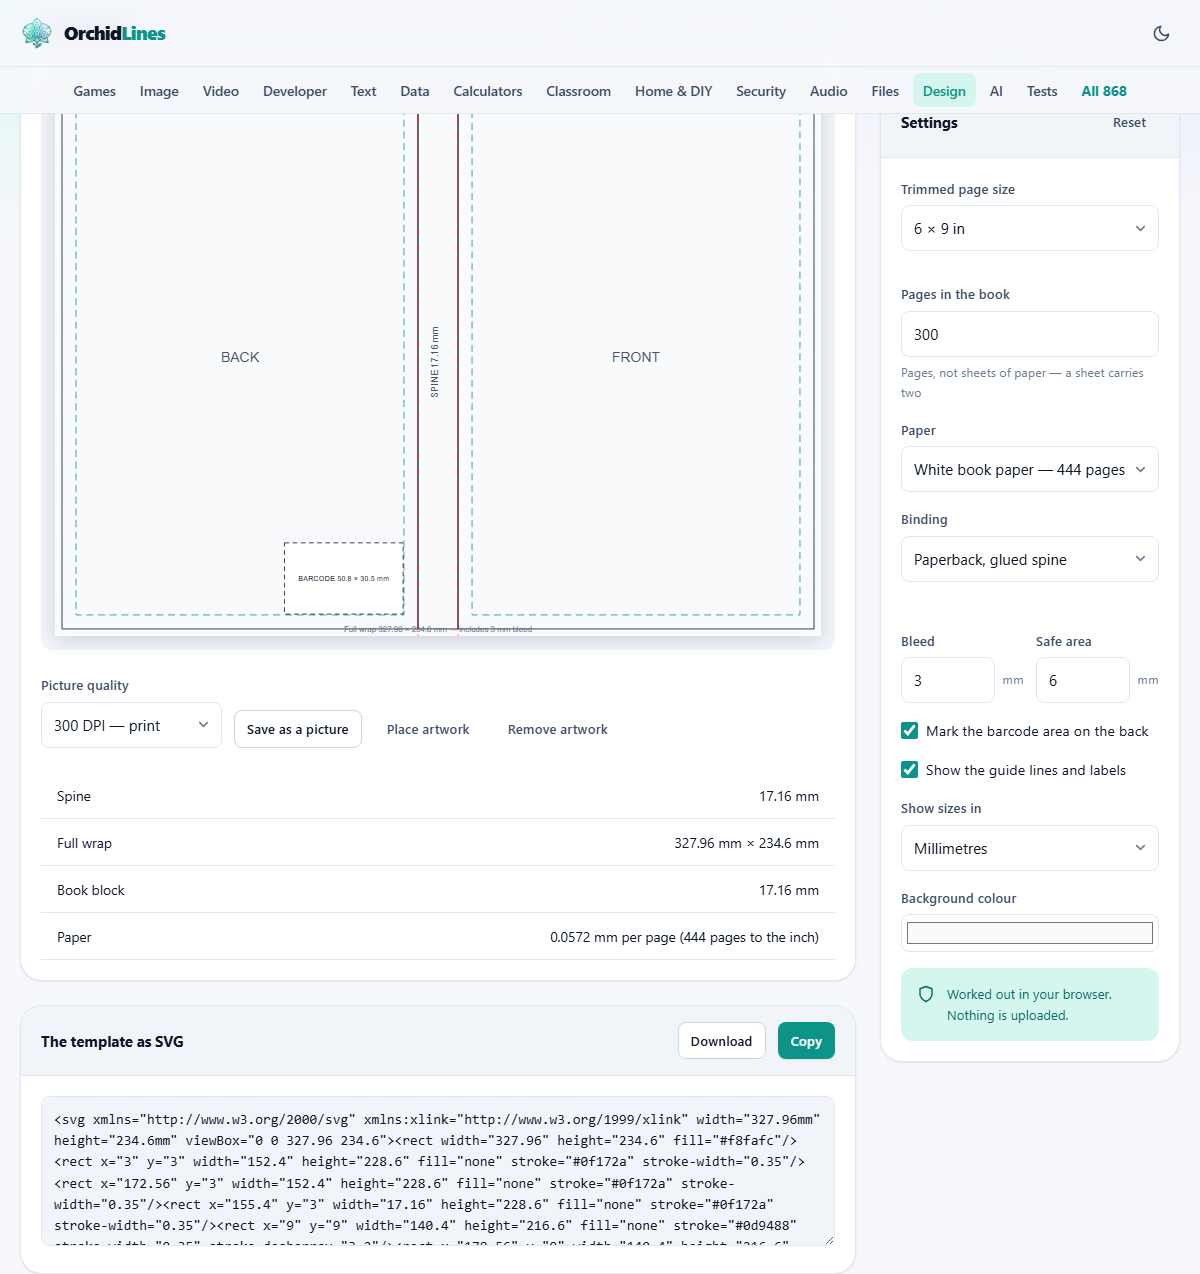
Work down the settings panel on the right. Trimmed page size is the finished size of a single page. Pick a named size such as six by nine inches, or A5, from the list. Choose Something else to type your own width and height, and the two boxes for them appear.
Pages in the book means the numbered pages, the ones a reader turns. One sheet of paper carries two of them, back and front, so a book a binder calls a hundred and fifty sheets is three hundred pages here. Type the page count, never the sheet count, or the spine comes out at half or double.
Paper sets how thick a single page is. Each stock in the list holds its own figure, from thin newsprint-style paper up to a heavy ninety gram sheet. If your printer gives you a number of its own, choose Measure my own and type it into Thickness of one page. To find it yourself, press a hundred pages flat, measure the stack, and divide by a hundred.
Paperback, hardback, or dust jacket
Binding changes the whole shape of the template, and it hides or shows boxes as you switch it. A glued paperback is the simple case. The spine is just the block of paper, and the sheet is back, spine and front in a row with bleed around the edge.
The two hardback choices wrap around stiff boards, so they ask for more. You set the board thickness, the board overhang past the pages, the hinge gap where the cover bends open, and a little spine ease. A printed case adds a turn-in, the strip that folds around the board edges. A dust jacket adds flaps that tuck inside the front and back covers.
- Board thickness and board overhang appear only for the two hardback bindings.
- Turn-in round the boards shows for the printed case.
- Jacket flap width shows for the dust jacket.
- Bleed is hidden for a printed case, which uses a turn-in instead.
The guides drawn on the sheet
Two more numbers protect the edges. Bleed is artwork carried past the cut line, so a slightly off cut leaves colour rather than a white sliver; three millimetres is the usual amount. Safe area is a margin just inside the cut where nothing you need to read should go, because the blade can drift inward as well as out.
Mark the barcode area on the back draws the box a shop code needs, low on the back cover, to be kept clear of your art. Show the guide lines and labels turns the whole set of marks on or off, which is handy once the layout is settled. You can flip the sizes between millimetres and inches, and set the background colour of the sheet with the colour box.
- A dark box marks the trim of each panel: back, spine and front.
- A dashed teal line shows the safe area inside each panel.
- Red dashed lines show where the cover folds at the spine.
- On a case, orange strips mark the hinge where the joint bends.
What you take away
The template appears as a drawing the moment you change a value. Below it, the same drawing is written out as SVG text. Download saves that as an SVG file you can open in a design program and build your artwork on top of. Copy puts the same text on your clipboard for pasting elsewhere.
Save as a picture turns the sheet into a PNG image instead. The Picture quality menu sets how fine it is: three hundred dots per inch for normal print, six hundred for fine work, a hundred and fifty for a quick proof. Place artwork drops one of your own images behind the guides so you can see how it lines up, and Remove artwork clears it again.
A small table under the drawing lists the spine, the full wrap size, the paper block, and the paper figure it used. If the spine falls under six millimetres it warns you, because the fold then wanders by more than the height of a letter, and any title on the spine will creep onto the front or the back.
A worked example, start to finish
Say you have a novel. It is six by nine inches, three hundred pages, printed on white book paper, glued as a paperback. Leave Trimmed page size on six by nine, set Pages in the book to three hundred, keep Paper on white book paper, and keep Binding on the paperback option.
The table now shows a spine of about 17.16 millimetres. The full wrap reads about 328 by 235 millimetres. That is two page widths, plus the spine, plus three millimetres of bleed all the way round. Download the SVG, open it in your design program, and place the title, the blurb and the author name using the fold lines and safe area as your frame.
Now suppose the same book is a hardback with a printed case. Switch Binding to the case option. The spine grows to roughly 23 millimetres, because it now has to clear two boards of two millimetres each plus a little ease, and the sheet gets wider to fold around them. The number changed, but you did not have to work any of it out.
What a printer wants to receive
A good cover file is one flat sheet at the final size, not three separate pages. The colour runs past every outer edge by the bleed amount. Nothing you need read sits in the safe margin. The spine is exactly as wide as the paper block, and the folds fall where the drawing marks them.
Keep any text off the spine unless the spine is wide enough to hold it, which is roughly a hundred pages and up on normal paper. Leave the barcode box empty of art. Send the file as vector where you can, so the type stays sharp, or as a high resolution image at three hundred dots per inch if the printer asks for a picture.
Slips that spoil a cover
The most common mistake is counting sheets instead of pages, which halves or doubles the spine at a stroke. Always enter the page number the reader sees.
The second is building the cover before the inside is final. Add a two-page dedication later and the spine shifts, and both folds shift with it. Finish the interior, lock the page count, then make the cover, in that order every time.
The third is letting art or words stray across the barcode box. A printer will drop the code into that corner whatever is under it, so leave the space clear from the start.
When to reach for something else, and where the work happens
This page measures and marks a cover; it does not paint one. For the picture, the type and the colour, open the SVG in a full design program, or start from the design editor on this site and drop these sizes in. Think of this as the ruler and the frame, not the finished art.
Every figure here is worked out inside your own browser. The page count, the paper number, and any image you place all stay on your machine and travel nowhere. You can close the tab knowing no copy of your cover was ever sent to a server.